GoPhish Installation and Phishing Simulation Setup
In this article, we will introduce how to install GoPhish on a local Ubuntu machine, publish it to the Internet through a Cloudflare Tunnel, and run a first phishing simulation campaign for security awareness training.
GoPhish is an open-source phishing toolkit for businesses and penetration testers. It lets you build email templates and landing pages, send campaigns to groups of users, and track who opened, clicked, submitted data or reported the email. It ships as a single Go binary with an embedded SQLite database, so it is easy to deploy and manage.
The result of this guide:
- GoPhish runs on a local machine (a lab server, VM or mini PC) with no public IP and no inbound port opened on your firewall.
- The phishing listener is published on a dedicated domain through a Cloudflare Tunnel; TLS is terminated at Cloudflare's edge.
- The admin UI listens only on localhost and is never published.
- Emails go out through an authenticated SMTP relay (Namecheap PrivateEmail in this example), with SPF/DKIM/DMARC aligned and the simulation allowlisted on the target's mail gateway.
Note: Run phishing simulations only with written authorization from the organization that owns the target mailboxes (scope, dates, target list, what data may be collected). Never collect real passwords: configure landing pages to capture the click and form submission only.
Architecture
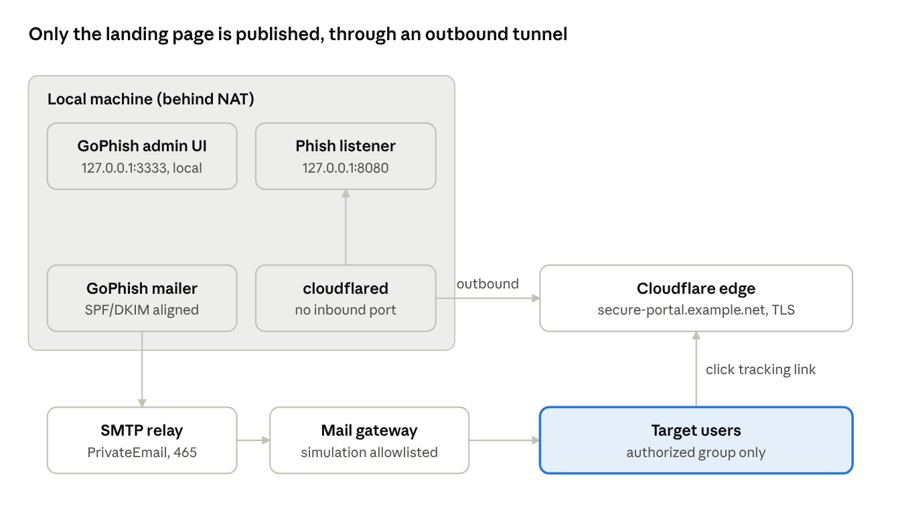
The local machine opens no inbound port: cloudflared keeps an outbound connection to Cloudflare, which serves the landing page over TLS. Emails leave through the SMTP relay, and the admin UI never leaves localhost.
Installation Environment and Versions
- Local machine: Ubuntu 24.04 LTS, 2 vCPU, 2 GB RAM, always on during the campaign (no laptop that goes to sleep)
- Domain: registered at Namecheap, DNS hosted on Cloudflare (Free plan is enough)
- Publishing:
cloudflared(Cloudflare Tunnel) - Mail: Namecheap PrivateEmail SMTP (any authenticated relay works: Mailgun, Amazon SES, Microsoft 365)
- GoPhish: v0.12.1 (releases)
| Item | Example value |
|---|---|
| Local machine | gophish-lab (192.168.1.50, behind NAT) |
| Phishing domain | secure-portal.example.net (Cloudflare Tunnel) |
| Sender mailbox | it-notice@example.net (Namecheap PrivateEmail) |
| Admin UI | 127.0.0.1:3333 (local only, never published) |
| Phishing listener | 127.0.0.1:8080 (only reachable through the tunnel) |
Use a domain you control and that is clearly yours. Do not register look-alike domains of a real third-party brand.
Move the Domain DNS to Cloudflare
Cloudflare Tunnel needs the domain's DNS on Cloudflare. Add the domain in the Cloudflare dashboard (Free plan), then in Namecheap → Domain List → Manage → Nameservers choose Custom DNS and enter the two nameservers Cloudflare assigned. Wait until the domain shows Active in Cloudflare.
The local machine only needs outbound access to Cloudflare (TCP/UDP 7844 for the tunnel, 443 for the API), plus outbound 465 or 587 to the SMTP relay. Nothing is opened inbound on your router or firewall.
Note: Cloudflare actively scans for phishing on its network and may show a warning page or suspend the hostname, even for an authorized simulation. Keep the written authorization at hand, use your own organization's branding (never a third-party brand), keep campaigns short, and remove the hostname when the campaign ends.
Download and Install GoPhish
Create a dedicated user and install the binary under /opt/gophish:
sudo apt-get update && sudo apt-get install -y unzip
sudo useradd -r -m -d /opt/gophish -s /usr/sbin/nologin gophish

cd /tmp
wget https://github.com/gophish/gophish/releases/download/v0.12.1/gophish-v0.12.1-linux-64bit.zip
sudo unzip gophish-v0.12.1-linux-64bit.zip -d /opt/gophish
sudo chmod +x /opt/gophish/gophish
sudo chown -R gophish:gophish /opt/gophish
Note: Check the release page for checksums and a newer version before you install. The asset name format above matches v0.12.1.
GoPhish Configuration
Configure config.json
Bind both listeners to localhost: the admin UI stays private, and cloudflared publishes only the phishing listener.
sudo -u gophish vim /opt/gophish/config.json
{
  "admin_server": {
    "listen_url": "127.0.0.1:3333",
    "use_tls": true,
    "cert_path": "gophish_admin.crt",
    "key_path": "gophish_admin.key",
    "trusted_origins": []
  },
  "phish_server": {
    "listen_url": "127.0.0.1:8080",
    "use_tls": false,
    "cert_path": "example.crt",
    "key_path": "example.key"
  },
  "db_name": "sqlite3",
  "db_path": "gophish.db",
  "migrations_prefix": "db/db_",
  "contact_address": "security-awareness@example.net",
  "logging": {
    "filename": "",
    "level": ""
  }
}
contact_addressis added to every email as theX-Gophish-Contactheader, so a recipient or mail admin can report the simulation.trusted_origins(new in v0.12.1) is only needed if you later publish the admin UI behind a reverse proxy on another hostname.- The admin certificate is self-signed and generated automatically on first start.
Run as a systemd Service
GoPhish uses relative paths, so WorkingDirectory is required:
sudo tee /etc/systemd/system/gophish.service > /dev/null <<'EOF'
[Unit]
Description=GoPhish phishing simulation
After=network-online.target

[Service]
Type=simple
User=gophish
Group=gophish
WorkingDirectory=/opt/gophish
ExecStart=/opt/gophish/gophish
Restart=on-failure
NoNewPrivileges=true
PrivateTmp=true

[Install]
WantedBy=multi-user.target
EOF
sudo systemctl daemon-reload
sudo systemctl enable --now gophish
Since v0.11 there is no default password. The initial admin password is generated randomly and printed in the log on first launch:
sudo journalctl -u gophish | grep -i "password"
==============================================================================
... Please login with the username admin and the password <random_password>
Access the Admin UI
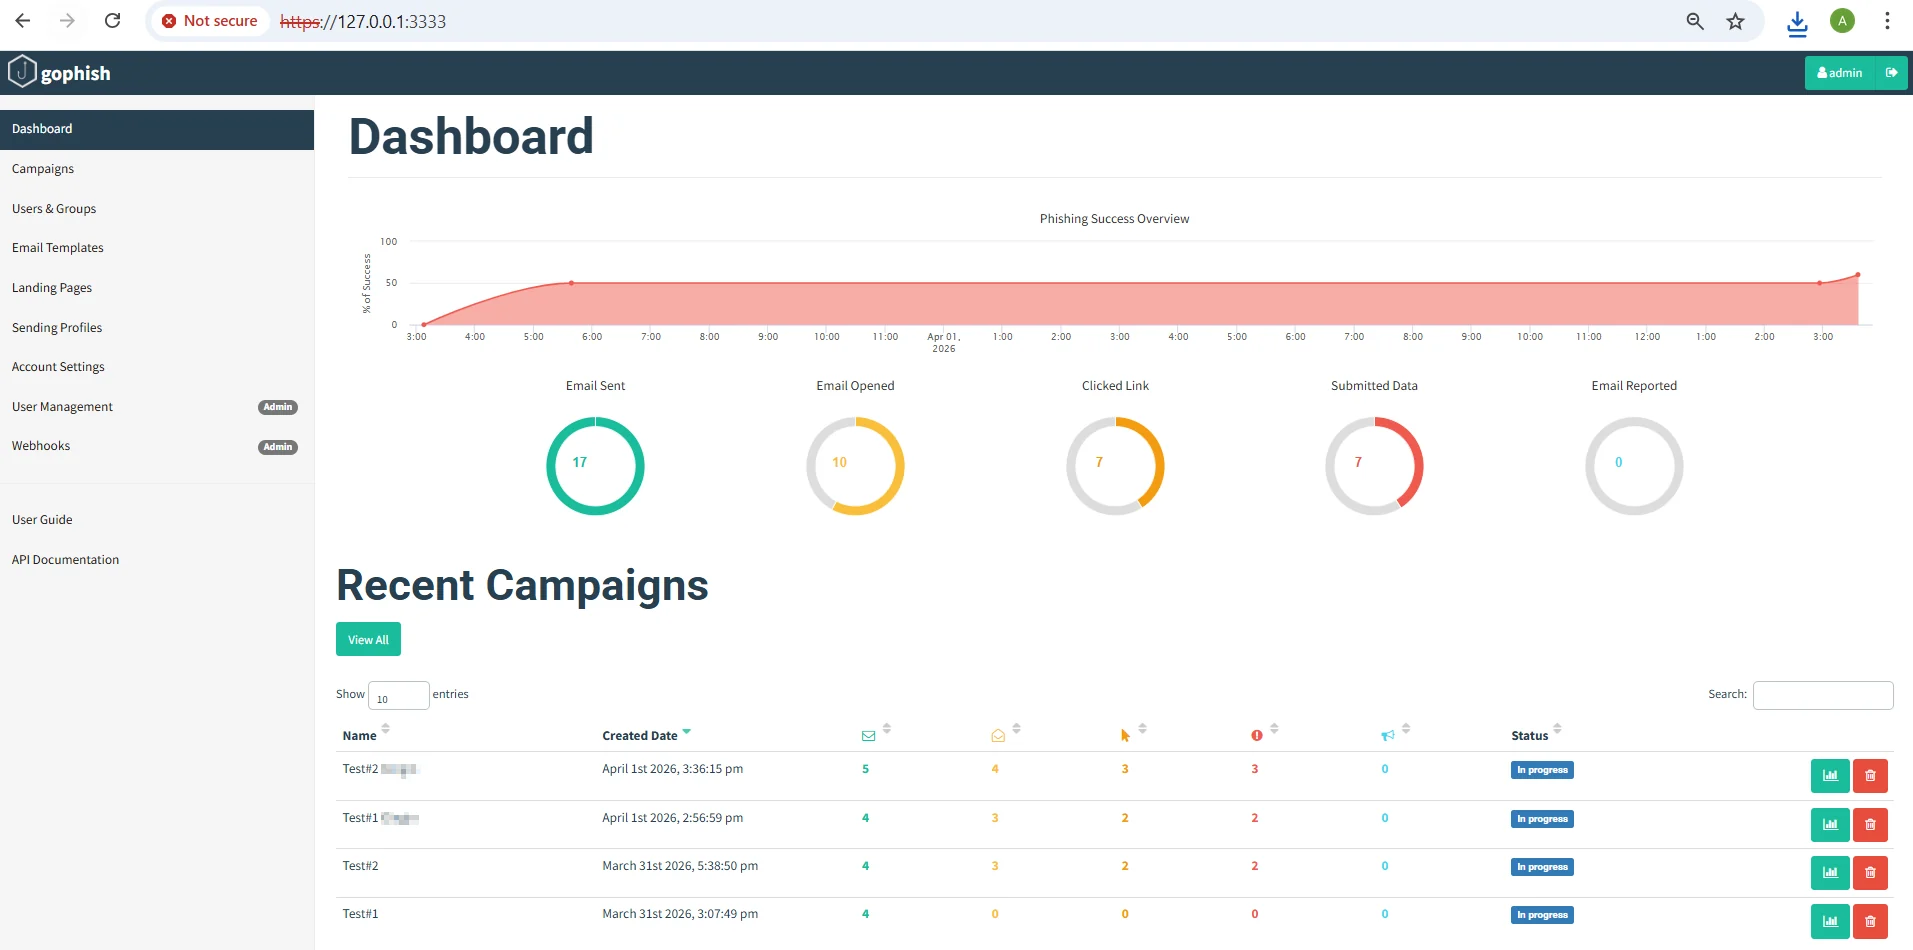
On the local machine (or from another host on the LAN through ssh -L 3333:127.0.0.1:3333 user@192.168.1.50), browse to https://127.0.0.1:3333 and accept the self-signed certificate.
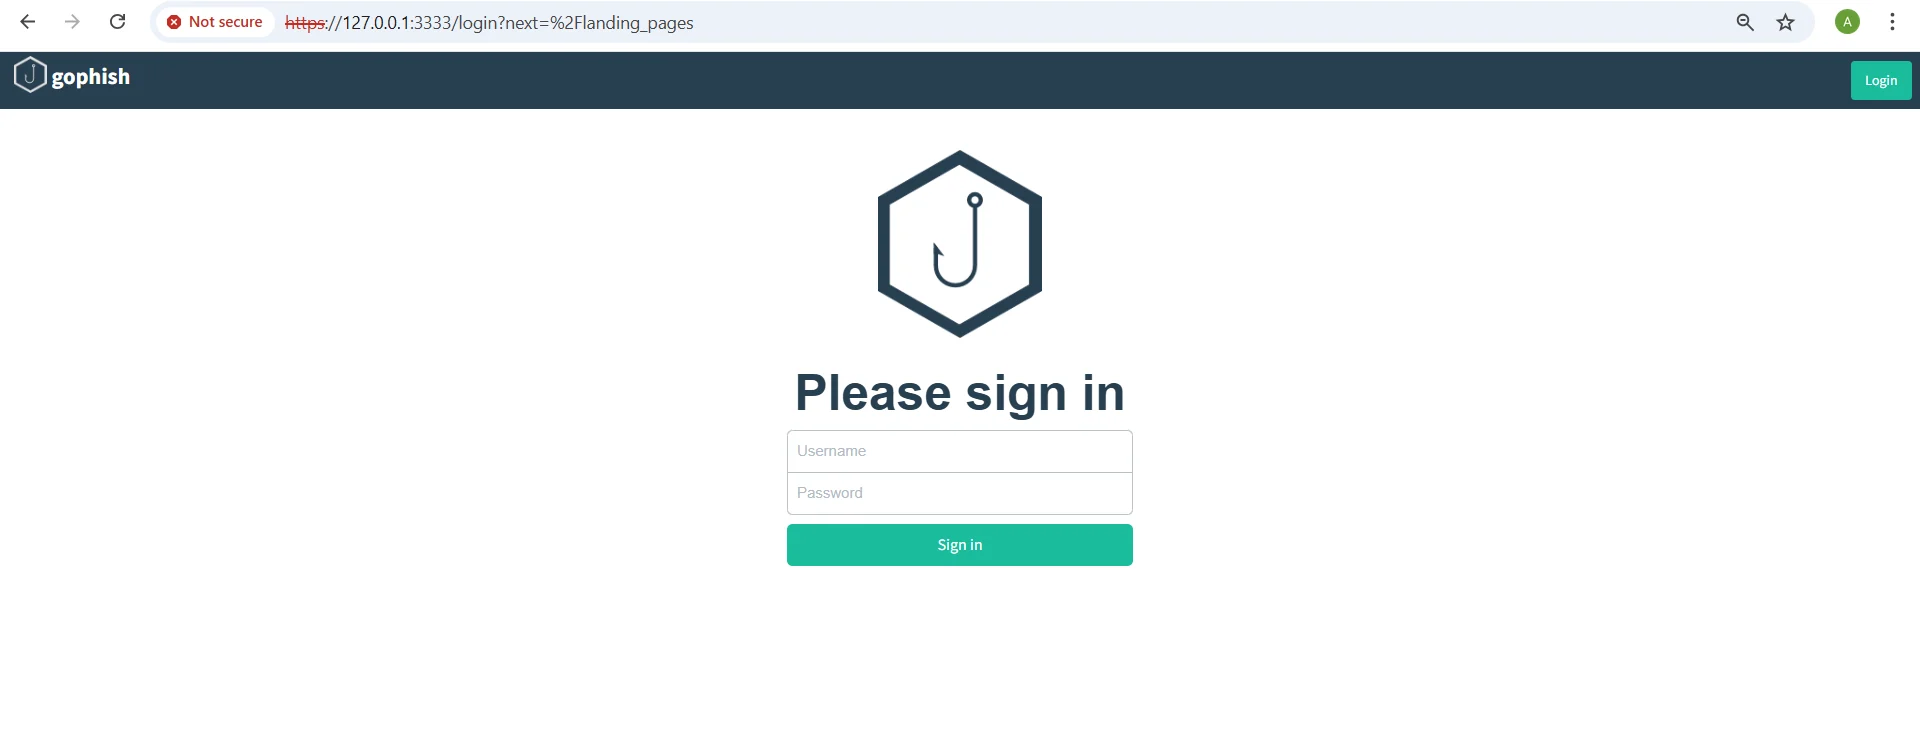
Log in with admin and the generated password. GoPhish forces a password change at first login. Then create one account per operator under User Management instead of sharing admin.
Publish the Phishing Listener with Cloudflare Tunnel
Install cloudflared from Cloudflare's APT repository:
sudo mkdir -p --mode=0755 /usr/share/keyrings
curl -fsSL https://pkg.cloudflare.com/cloudflare-main.gpg | sudo tee /usr/share/keyrings/cloudflare-main.gpg > /dev/null
echo 'deb [signed-by=/usr/share/keyrings/cloudflare-main.gpg] https://pkg.cloudflare.com/cloudflared any main' | sudo tee /etc/apt/sources.list.d/cloudflared.list
sudo apt-get update && sudo apt-get install -y cloudflared
Authenticate, create a named tunnel and route the hostname to it (this creates a proxied CNAME in Cloudflare DNS):
cloudflared tunnel login                      # opens a browser, pick example.net
cloudflared tunnel create gophish
==============================================================================
Created tunnel gophish with id <TUNNEL_ID>
cloudflared tunnel route dns gophish secure-portal.example.net
Create the tunnel configuration. Only the phishing listener is published; everything else returns 404:
sudo mkdir -p /etc/cloudflared
sudo cp ~/.cloudflared/<TUNNEL_ID>.json /etc/cloudflared/
sudo tee /etc/cloudflared/config.yml > /dev/null <<'EOF'
tunnel: <TUNNEL_ID>
credentials-file: /etc/cloudflared/<TUNNEL_ID>.json

ingress:
  - hostname: secure-portal.example.net
    service: http://127.0.0.1:8080
  - service: http_status:404
EOF
Run it as a service and verify:
sudo cloudflared service install
sudo systemctl enable --now cloudflared
cloudflared tunnel info gophish
curl -sI https://secure-portal.example.net | head -1
In the Cloudflare dashboard, set SSL/TLS → Edge Certificates → Always Use HTTPS to on. The origin stays plain HTTP on 127.0.0.1:8080, which never leaves the machine.
Note: Never add 127.0.0.1:3333 to the ingress rules. If remote admin access is really needed, publish it on a separate hostname protected by Cloudflare Access (SSO/OTP policy), and add that hostname to trusted_origins in config.json, otherwise GoPhish rejects the login with a CSRF error.
Note: Behind the tunnel, GoPhish may record 127.0.0.1 as the client IP. Cloudflare sends the real address in CF-Connecting-IP and X-Forwarded-For; check what your GoPhish version stores after the first test campaign.
Mail Delivery
DNS is where most phishing simulations fail: if SPF, DKIM and DMARC are wrong, the emails never reach the inbox and the campaign measures your mail gateway instead of your users.
DNS Records on Cloudflare
Since the nameservers now point to Cloudflare, mail records are added in Cloudflare → DNS → Records (not in Namecheap Advanced DNS anymore). The CNAME for the landing page was created by cloudflared tunnel route dns. Copy the exact PrivateEmail values from your PrivateEmail panel. Mail records must be DNS only (grey cloud).
| Type | Name | Value | Purpose |
|---|---|---|---|
| CNAME (proxied) | secure-portal |
<TUNNEL_ID>.cfargotunnel.com |
Landing page through the tunnel (auto-created) |
| MX | @ |
mx1.privateemail.com / mx2.privateemail.com |
Mailbox for replies and bounces |
| TXT | @ |
v=spf1 include:spf.privateemail.com ~all |
SPF: who may send for the domain |
| TXT | default._domainkey |
(key from PrivateEmail → DKIM) | DKIM signature |
| TXT | _dmarc |
v=DMARC1; p=none; rua=mailto:dmarc@example.net; fo=1 |
DMARC monitoring and reports |
Check propagation before going further:
dig +short secure-portal.example.net          # Cloudflare edge IPs (proxied)
dig +short MX example.net
dig +short TXT example.net
dig +short TXT default._domainkey.example.net
dig +short TXT _dmarc.example.net
Note: Use a new domain for the simulation, not your production domain, and let it age a few days before the first campaign. Brand-new domains are often flagged by mail and web filters.
Sending Profile
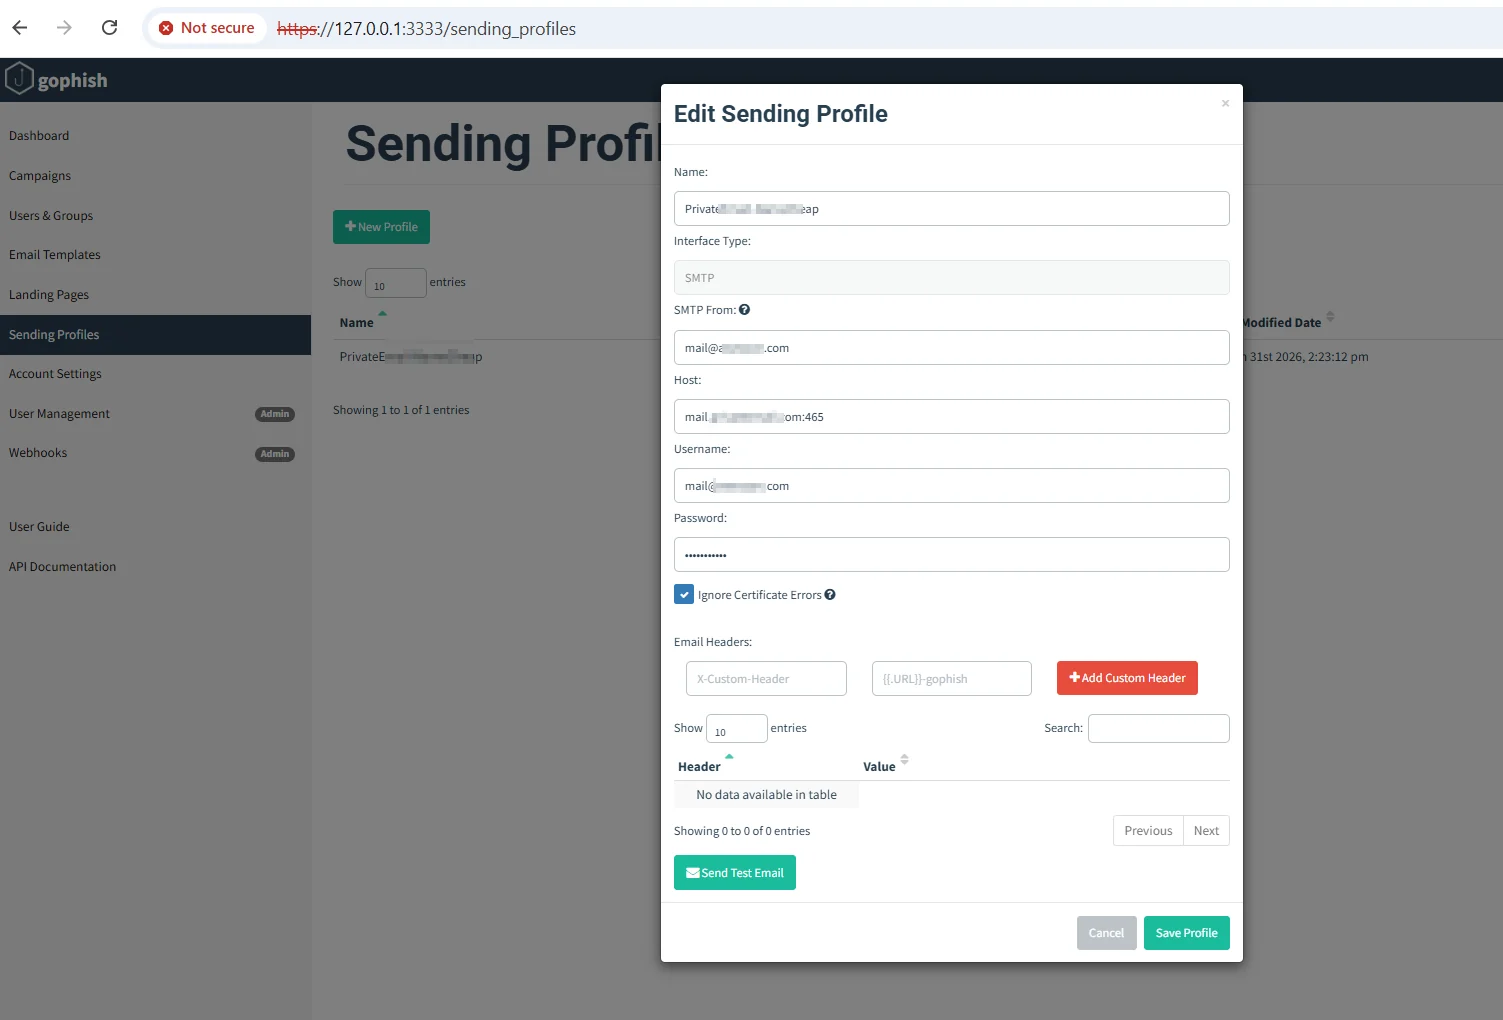
In GoPhish → Sending Profiles → New Profile:
| Field | Value |
|---|---|
| Name | PrivateEmail - it-notice |
| From | IT Service Desk <it-notice@example.net> |
| Host | mail.privateemail.com:465 (or :587 with STARTTLS) |
| Username / Password | PrivateEmail mailbox credentials |
| Ignore Certificate Errors | Unchecked |
The From address must be on the same domain that SPF and DKIM cover, otherwise DMARC alignment fails. Click Send Test Email to your own mailbox and check the headers: spf=pass, dkim=pass, dmarc=pass.
Allowlist the Simulation on the Target Mail Gateway
For an internal awareness program, the goal is to test people, not to bypass the email filters. Ask the mail administrator of the target organization to allowlist the simulation, for example:
- Microsoft 365: Defender portal → Email & collaboration → Policies → Advanced delivery → Phishing simulation (sending domain, sending IP of the relay, simulation URL).
- Google Workspace: an inbound gateway / spam allowlist rule for the sending domain or IP.
- On-premise gateways (FortiMail, Proofpoint, Cisco...): bypass rule for the sending IP and domain, and URL rewriting / sandbox exclusion for the phishing domain, so automated link scanners do not create false clicks.
Keep the X-Gophish-Contact header. It lets SOC analysts identify the simulation quickly if a user reports the email.
Run a Campaign
A campaign combines five objects. Create them in this order in the admin UI.
1. Users & Groups
Users & Groups → New Group, then add users manually or import a CSV with this header:
First Name,Last Name,Email,Position
An,Nguyen,an.nguyen@target.example,Accountant
Binh,Tran,binh.tran@target.example,HR Officer
Start with a small pilot group (IT and security staff) to validate delivery and tracking before the real target list.
2. Email Templates
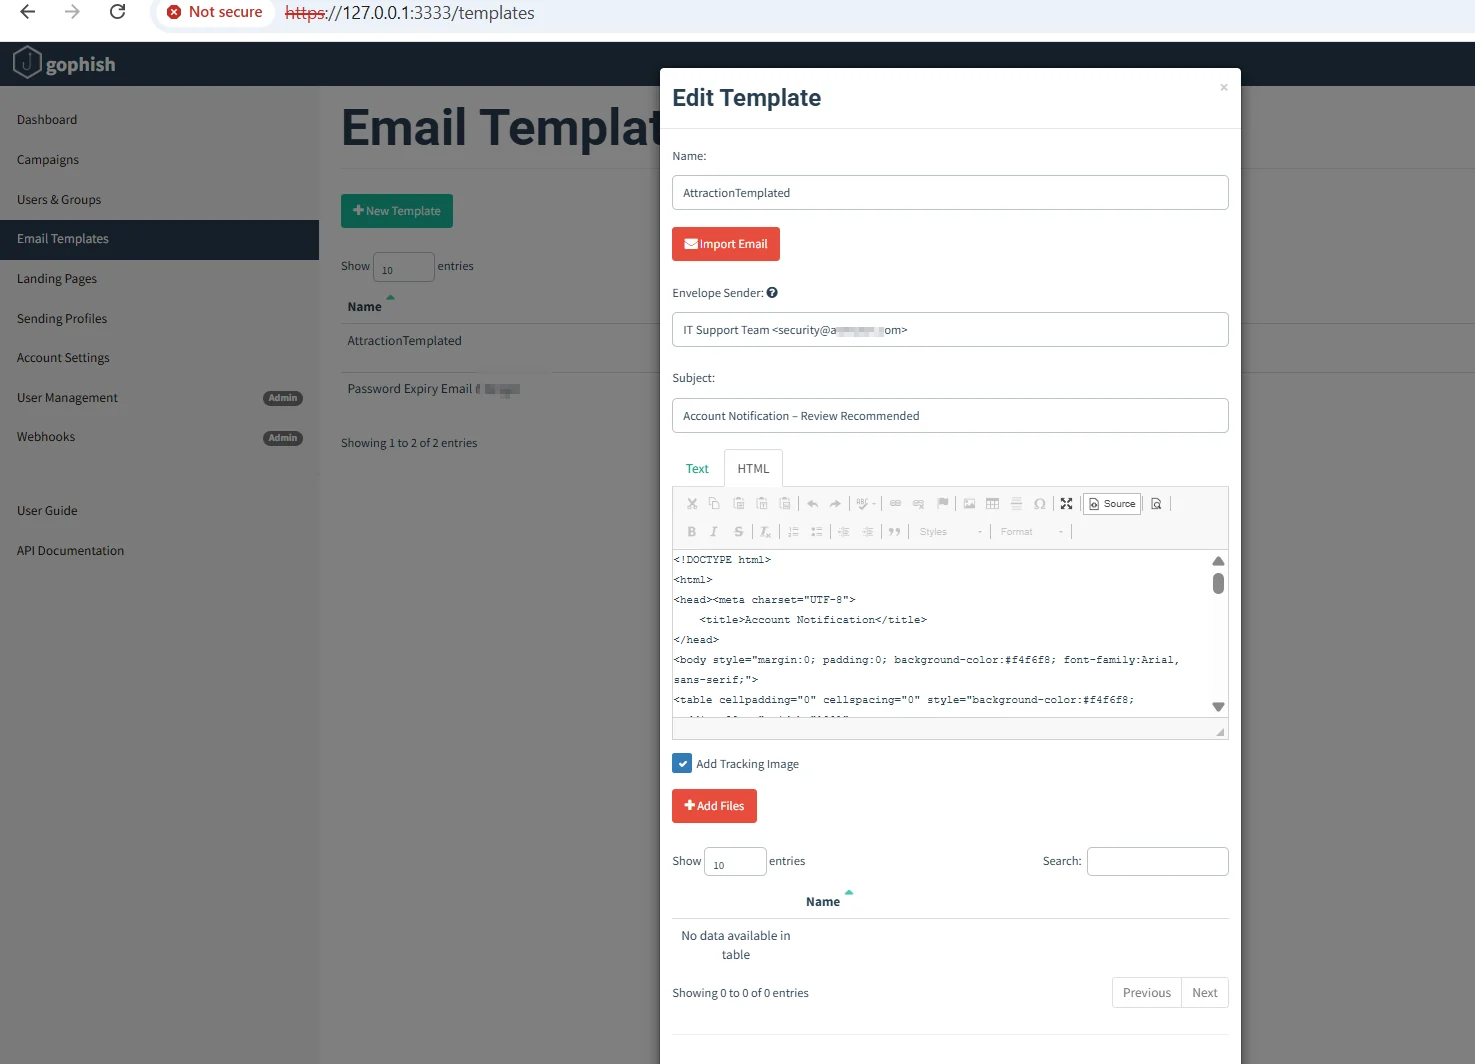
Email Templates → New Template: set a name, subject and HTML body. The important template variables are:
| Variable | Meaning |
|---|---|
{{.URL}} |
Unique tracking link for each recipient (required) |
{{.Tracker}} |
Invisible image that records the "Email Opened" event |
{{.FirstName}}, {{.LastName}}, {{.Position}} |
Personalization from the group CSV |
Keep Add Tracking Image enabled. Build scenarios that match your training goals (password expiry, shared document, delivery notice) using your own organization's context, not a third-party brand.
3. Landing Pages
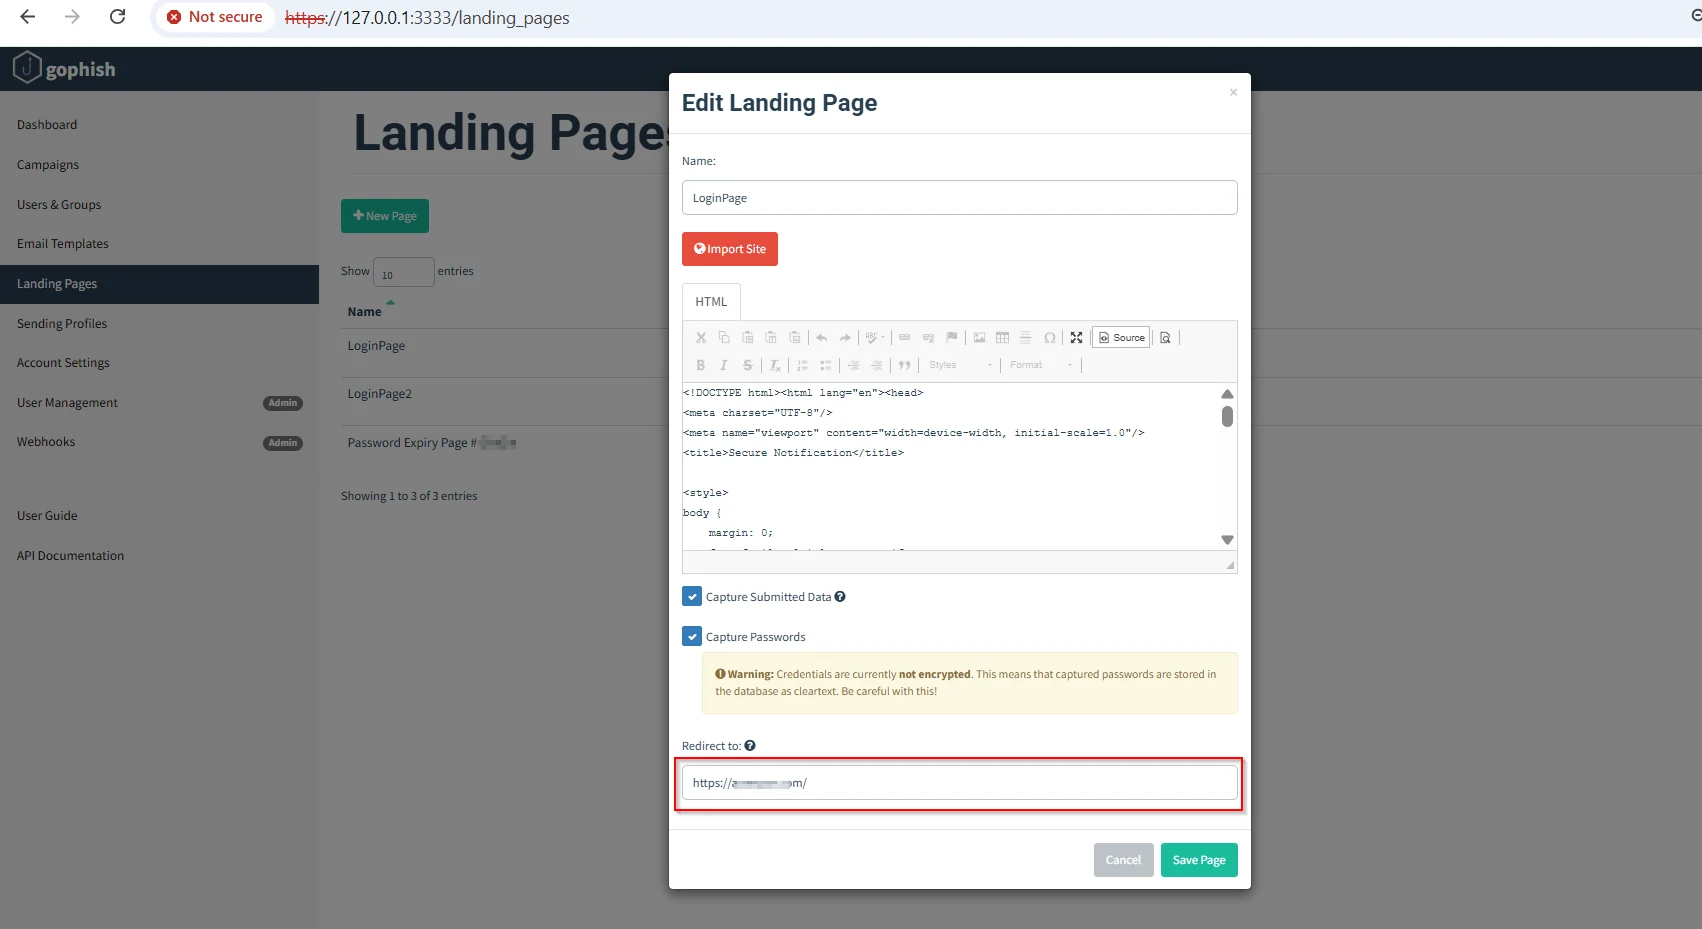
Landing Pages → New Page, paste your HTML or use Import Site on a page you own.
- Enable Capture Submitted Data to record that a user submitted the form.
- Leave Capture Passwords disabled. GoPhish then stores the event without the password value, which is enough to measure behavior and avoids holding real credentials.
- Set Redirect to an internal awareness page that explains the warning signs the user missed.
4. Sending Profile
Use the profile created in Mail Delivery.
5. Campaigns
Campaigns → New Campaign:
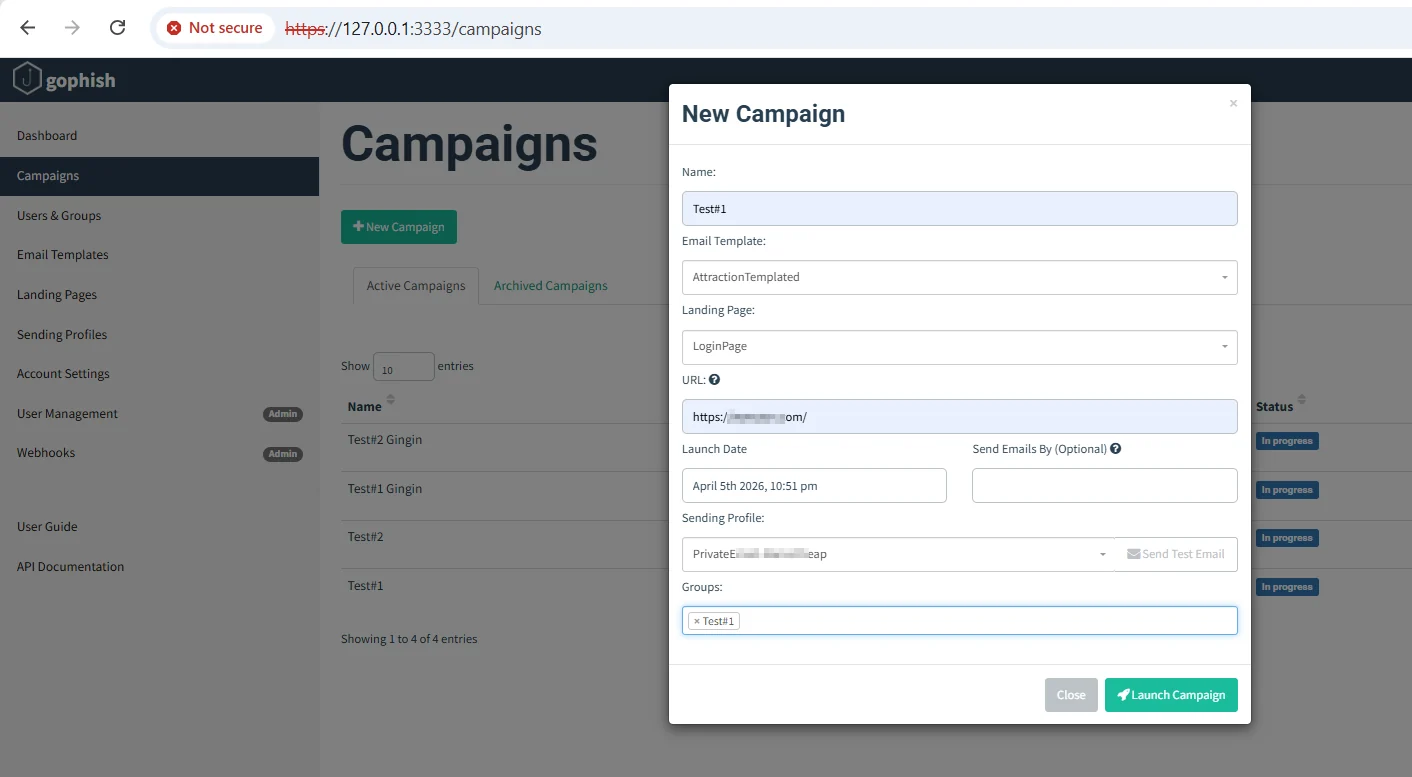
| Field | Value |
|---|---|
| Email Template / Landing Page / Sending Profile | The objects created above |
| URL | https://secure-portal.example.net |
| Launch Date | Agreed start time |
| Send Emails By | Spread over 1–2 hours to avoid rate limits and bursts |
| Groups | Target group |
Click Launch Campaign.
Read the Results
The campaign page shows a timeline per recipient and these counters:
| Event | What it tells you |
|---|---|
| Email Sent | Delivery attempt accepted by the relay |
| Email Opened | Tracking image loaded (undercounted when images are blocked) |
| Clicked Link | User opened {{.URL}} |
| Submitted Data | User submitted the landing page form |
| Email Reported | User reported the email (via a report button integration calling GoPhish's report endpoint) |
The most useful awareness metrics are the click rate, the submit rate and the report rate. Export results as CSV (Export CSV on the campaign page) for the report, and treat them as personal data.
Conclusion
I introduced a way to run GoPhish on a local machine and publish only its landing pages through a Cloudflare Tunnel, without a cloud VM, a public IP or any inbound firewall rule. Combined with aligned SPF/DKIM/DMARC and an allowlist on the mail gateway, the campaign measures what matters: how users react to a phishing email. Hope you find it helpful!
Comments
Join the discussionNo comments yet. Be the first to comment.